Ice Cream in a Bag
This activity is designed to get students and teachers involved. Working in teams of two, ingredients are bagged and placed into a coffee can. Inside the can will be a 2nd bag of ice and rock salt. After 10 minutes of can rolling, the ice cream treat forms! Click here for the Dairy Ag Mag. We also have a Dairy PowerPoint available at our office.
1. Empty and clean a 3-pound coffee can and a 1-pound
coffee can.
2. Mix 1 pint of half & half with a 1/2 cup sugar in the
small can. Add a little vanilla or fruit if you like.
3. Place the lid on the small can, secure it with duct
tape and then place the small can inside the large can.
4. Pack ice around the small can. Then sprinkle about 2
tablespoons of rock salt on the ice. Finally, fill the
rest of the can with ice.
5. Place the lid on the large can. Secure the lid with
duct tape so it does not fall off.
6. Sit on the floor with some friends and roll the large
can to each other. You may want to put a tarp on the
floor for this. After about 10 minutes of rolling your
can, you will have made ice cream in the small can!
7. Remove the small can and rinse it with
water before opening. If you don't, you
may end up with salt in your ice
cream.
What are the ingredients in your ice cream? Are they the same as ingredients in store bought ice cream?
Why did you use ice for this activity? Why did you use salt for this activity?
Pumpkin Patch Pie
A 30 minute presentation or in-service that has a Power Point illustrating the life cycle of Pumpkins. The teacher and the Farm Bureau volunteers then prepare a Pumpkin Patch Pie treat for the students. October only! Grade 1
Objectives:
1.) Life Cycle from seed germination, leaves, flowers, pollination to mature pumpkin
2.) History of pumpkins
3.) Variety of pumpkins and squash
4.) Make a Pumpkin Patch Pie that teacher and students create and then eat!
Time: Thirty to 45 minutes
Available dates: Sep 24 - Oct 31
Format:
The presentation begins with display of a variety of pumpkins and squash. When available, a large section of pumpkin vine with leaves, flowers, and developing pumpkins will be shown to students. A short power point reviews the history of pumpkins and the complete life cycle from seed to vines to leaves, flowers, pollination, and pumpkin development.
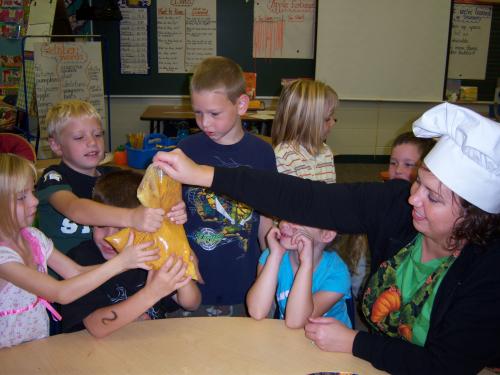
The teacher then, puts on a chef's hat and pumpkin apron. We will assist the teacher in following a simple recipe with ingredients put into a gallon zip lock bag. Students delight in squeezing the bag's ingredients together. A corner of the bag is snipped and we will squeeze the mixture into a cup containing graham cracker crumbs. Whipped cream tops the pie off.
The teacher receives 30 copies of our student Ag Pumpkin Magazine for the students. Recipe, activities, interviews with pumpkin farmers are within the Ag Mag. View the Pumpkin Ag Mag by clicking here. We also have a Pumpkin PowerPoint available at our office.
Our Needs:
*Multiple Presentations-
1.) We prefer to set up in a room (classroom, library, gym, hallway, etc & . Then, have the classes come to us. We will provide our own computer and projection device. Your school provides the screen.
2.) We can provide additional presenters for schools with more than
three sections. Please provide a computer, projection device, screen
and additional room for our use.
Email mcfbaitc@att.net or call 815-338-1521 for further information.